note


July 2013

Processingアプレット(PApplet)をJavaプログラムから起動

ProcessingのPAppletプログラムをJavaプログラムから起動する場合のメモ。
例えば、TestPAppletというプログラムをJavaで書いたとして(
参考)、
これを別のプログラムから起動する場合、


TestApplet testPApplet = new TestPApplet();
testPApplet.init();


つまり、init()で初期化できる。
JFrameに貼ればおしまい。


JFrame frame = new JFrame(“Test");
frame.setSize(640,480); //
サイズは適当。上で作ったインスタンスからゲットするのもいいと思います。
frame.add(
testPApplet);
frame.setVisible(
true);


JavaでOpenCVでWebカメラのキャプチャ(Mac)

JavaでOpenCVでWebカメラキャプチャのコードです。
ほぼここの
記事通りだけど、そのままだとMacでは動かなかったため(カメラ起動までが遅いので、カメラなしと怒られて終了します)、改造しました。
後は、元々のカメラサイズだと重くてリアルタイムにキャプチャできなかったから、MatをBufferedImageに変換するのを軽くするために、Matのサイズを小さくしてから処理してます。
http://cell0907.blogspot.jp/2013/06/creating-windows-and-capturing-webcam.html
Thank you for sample code !

VideoCapture capture =new VideoCapture(0);
の引数を変えてやると、複数台カメラつないだ場合も、別のカメラでキャプチャできます。

同時に複数カメラからもキャプチャできます。
VideoCapture capture1 =new VideoCapture(0);
VideoCapture capture2 =
new VideoCapture(1);

引数の数字がどのWEBカメラに割り当てられるかは、WEBカメラをつないだ順番によります。
ココらへんはまだ微妙。gstreamerを使う場合は、カメラ名に加え、キャプチャサイズやfpsも指定して接続できるんだけど、
OpenCVが使ってるカメラキャプチャにはそういう方法があるのでしょうか。


import java.awt.*;
import java.awt.image.BufferedImage;
import javax.swing.*;
import org.opencv.core.Core;
import org.opencv.core.Mat;
import org.opencv.core.Size;
import org.opencv.highgui.VideoCapture;
import org.opencv.imgproc.Imgproc;

public class Panel extends JPanel{
private static final long serialVersionUID = 1L;
private BufferedImage image;
// Create a constructor method
public Panel(){
super();
}
private BufferedImage getimage(){
return image;
}
private void setimage(BufferedImage newimage){
image=newimage;
return;
}
/**
* Converts/writes a Mat into a BufferedImage.
*
* @param matrix Mat of type CV_8UC3 or CV_8UC1
* @return BufferedImage of type TYPE_3BYTE_BGR or TYPE_BYTE_GRAY
*/
public static BufferedImage matToBufferedImage(Mat matrix) {
int cols = matrix.cols();
int rows = matrix.rows();
int elemSize = (int)matrix.elemSize();
byte[] data = new byte[cols * rows * elemSize];
int type;
matrix.get(0, 0, data);
switch (matrix.channels()) {
case 1:
type = BufferedImage.
TYPE_BYTE_GRAY;
break;
case 3:
type = BufferedImage.
TYPE_3BYTE_BGR;
// bgr to rgb
byte b;
for(int i=0; ilength; i=i+3) {
b = data[i];
data[i] = data[i+2];
data[i+2] = b;
}
break;
default:
return null;
}
BufferedImage image2 =
new BufferedImage(cols, rows, type);
image2.getRaster().setDataElements(0, 0, cols, rows, data);
return image2;
}
public void paintComponent(Graphics g){
BufferedImage temp=getimage();
if(temp!=null){
g.drawImage(temp,10,10,temp.getWidth(),temp.getHeight(),
this);
}
}

public static void main(String arg[]){
// Load the native library.
System.loadLibrary(Core.
NATIVE_LIBRARY_NAME);
JFrame frame =
new JFrame("BasicPanel");
frame.setDefaultCloseOperation(JFrame.
EXIT_ON_CLOSE);
frame.setSize(400,400);
Panel panel =
new Panel();
frame.setContentPane(panel);
frame.setVisible(
true);
Mat webcam_image=
new Mat();
BufferedImage temp;
VideoCapture capture =
new VideoCapture(0);

if( capture.isOpened())
{
while( true )
{

capture.read(webcam_image);
if( !webcam_image.empty() )
{
Imgproc.resize(webcam_image, webcam_image,
new Size(webcam_image.size().width*0.3,webcam_image.size().height*0.3));
frame.setSize(webcam_image.width()+40,webcam_image.height()+60);
temp=matToBufferedImage(webcam_image);
panel.setimage(temp);
panel.repaint();
}
else
{
System.
out.println(" --(!) No captured frame -- ");
}
}
}
return;
}
}


EclipseでProcessingを横着に使う設定(Mac)

Eclipseを使って、Processingをコーディングしたい。
むしろ、Javaプログラムの1要素としてProcessingを利用したい場合があります。Javaの無限のライブラリも使えますので。
例えば、Processingでwebカメラの映像をキャプチャさせて、それをJavaでゴニョゴニョしたいとき。

もちろん、ProcessingのライブラリをEclipseにインポートするのですが、
横着なやり方を紹介します。

(1) Processing.app内のライブラリをどっかにごっそりコピー

%cp -r /Applications/Processing.app/Contents  /Users/ユーザ名/Desktop/

もしくは、Finderを使って、Processing.appの中身(パッケージの中身)をどっかにコピー

例ではデスクトップにコピーしてますが、どこでもいいです。
なぜコピーするかというと、以下のeclipseの外部ライブラリ追加のところで直接Processing.app内のリソースへアクセスができなかったからです。
だから、横着にコピーしました。

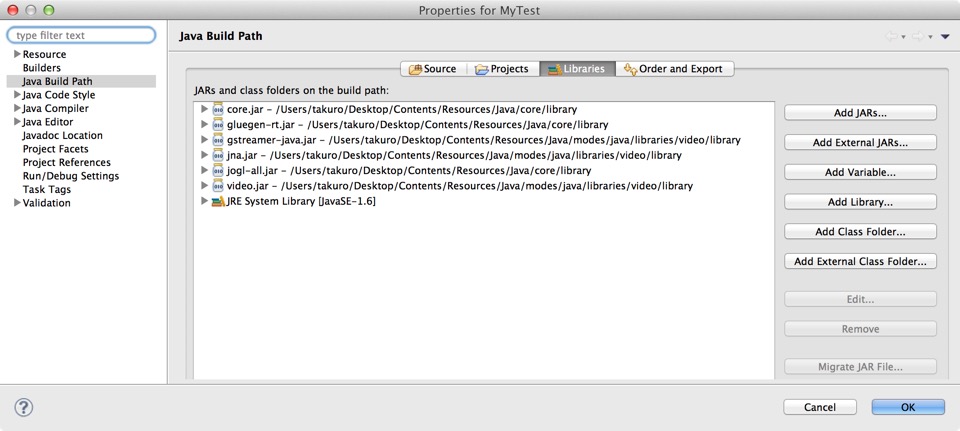
(2) Eclipseから新規プロジェクト作成し、メニューのProject -> Properties でProcessingライブラリへBuild Pathを設定。

Add External JARs(外部ライブラリの追加)から、さっきコピーした中身にあるProcessingのライブラリを追加。

Processingの基本ライブラリは
コピーしたディレクトリの中の

Contents/Resources/Java/core/library


内に、カメラから映像キャプチャなどのライブラリは、

Contents/Resources/Java/modes/java/libraries/


以下、例えばvideo関係は

Contents/Resources/Java/modes/java/libraries/video/library


内にあります。
こんな感じ。

Pasted Graphic


(3) 後はコードを書くだけ。

例えば、ProcessingサンプルのWEBカメラから画像をキャプチャして表示するプログラムは、こんな感じです。


import processing.video.*;
import processing.core.*;

public class VideoCapTest extends PApplet{

Capture
cam;


public void setup() {
size(640, 480,
P2D);

String[] cameras = Capture.list();

if (cameras.length == 0) {
println(
"There are no cameras available for capture.");
exit();
}
else {
println(
"Available cameras:");
for (int i = 0; i < cameras.length; i++) {
println(cameras[i]);
}

// The camera can be initialized directly using an element
// from the array returned by list():
cam = new Capture(this, cameras[0]);
cam.start();
}
}

public void draw() {
if (cam.available() == true) {
cam.read();
}
image(
cam, 0, 0);
// The following does the same, and is faster when just drawing the image
// without any additional resizing, transformations, or tint.
//set(0, 0, cam);
}


}


おまけ
Processingからカメラでキャプチャした画像を、BufferedImageへ変換の例。


BufferedImage buf = new BufferedImage(320,240, 1);
buf.getGraphics().drawImage(
cam.getImage(),0,0,null);